A Complete Guide to the LinkedIn Carousel Post Format
Master the LinkedIn carousel post format with this guide. Learn the correct dimensions, file types, best practices, and expert tips to boost engagement.

The LinkedIn carousel post format is essentially a multi-slide document, most often a PDF, that lets people swipe through a series of visual cards right in their feed. This interactive format has become a real powerhouse for professionals because it keeps users’ attention far longer than a static image and, as a result, tends to drive much higher engagement.
Understanding the LinkedIn Carousel Post Format

So, what exactly is a LinkedIn carousel? It’s often called a “document post” because you’re uploading a file like a PDF or a PowerPoint, and LinkedIn transforms it into an interactive, swipeable presentation. It’s not the same as a standard multi-image post; the carousel format delivers a much more structured and story-like experience. It’s your chance to guide your audience through a narrative, a step-by-step process, or a deep dive into a complex topic, one slide at a time.
The real strength of this format is how it marries compelling visuals with genuinely useful information. By breaking your content down into bite-sized slides, you can make complicated ideas much easier for your audience to digest and remember. This naturally encourages people to spend more time on your post, which is a big, positive signal to the LinkedIn algorithm and can seriously expand your post’s reach.
Key Characteristics of This Format
Here are the core features that make the LinkedIn carousel format so effective:
- Interactive Slides: Users have to physically swipe or click to see the next card, which is an active form of engagement that boosts the time they spend on your content.
- Narrative Control: You dictate the exact order of the information, allowing you to build a coherent story from the first slide right through to the call to action on the last one.
- Versatile Content: It’s an incredibly flexible format. It works brilliantly for tutorials, case studies, data visualisations, listicles, and even for repurposing long-form content like blog posts.
- Professional Appearance: A thoughtfully designed carousel comes across as a polished, high-value piece of content—almost like a mini-presentation or a professional slide deck.
Key Technical Specifications for LinkedIn Carousels

Before you even start designing, it pays to get the technical details right. Nailing these specs from the get-go will save you a world of frustration with upload errors and ensure your carousel looks sharp and professional on every device.
The way LinkedIn carousels work is a little different from a standard multi-image post. You’re actually uploading a single document, which the platform then cleverly converts into a swipeable presentation. This LinkedIn carousel post format has one massive advantage: you can embed clickable hyperlinks right inside your document, something you just can’t do with a gallery of images.
File Types and Size Limits
Your choice of file type really does matter for the final output. LinkedIn accepts a few different formats, but for reliability and functionality, the PDF is the undisputed champion.
- Accepted File Types: You can use PDF, PPT, PPTX, DOC, and DOCX.
- File Size Limit: Keep your file under the 100 MB maximum.
- Page/Slide Limit: You have plenty of room to tell your story, with a cap of 300 pages or slides.
I always recommend exporting your design as a high-quality PDF. It does the best job of keeping your text crisp, your graphics sharp, and, most importantly, your hyperlinks active. This gives your audience a much better, more interactive experience.
Optimal Dimensions and Aspect Ratios
Getting your dimensions right is non-negotiable if you want to command attention in the feed. While LinkedIn is flexible, square and portrait orientations are your best bet for grabbing maximum screen real estate, especially on mobile.
If you want to dig deeper into how images work on the platform, our guide on the ideal LinkedIn post image size is a great resource.
To make things easy, here’s a quick summary of the technical specs you’ll need.
LinkedIn Carousel Format Quick Reference
This table breaks down the essential technical details for creating a perfect LinkedIn carousel post.
| Attribute | Recommendation | Notes |
|---|---|---|
| File Type | Best for preserving quality, vector graphics, and clickable links. | |
| File Size | Max 100 MB | Anything larger will result in an upload error. |
| Page Count | Max 300 pages | More than enough for even the most detailed content. |
| Aspect Ratio (Square) | 1:1 (e.g., 1080 x 1080 px) | The most versatile option, looks great on both desktop and mobile. |
| Aspect Ratio (Portrait) | 4:5 (e.g., 1080 x 1350 px) | Takes up more vertical space in the mobile feed for greater impact. |
| Aspect Ratio (Landscape) | 16:9 (e.g., 1920 x 1080 px) | Works well if you’re repurposing existing presentation slides. |
Stick to these recommendations, and you’ll avoid any awkward cropping or fuzzy text, ensuring your content always looks its best.
How to Maximise Engagement with Carousel Content
Forget just the technical specs. The real magic of a LinkedIn carousel post is its power to tell a story. It’s a format built to stop the scroll and pull people in, turning a passive glance into an active swipe. When you structure your content like a mini-narrative, you give your audience a reason to keep going, slide after slide.
This interactive element is exactly why carousels consistently knock other post types out of the park. Just look at the numbers: recent data shows carousel posts hit an average engagement rate of 24.42%. That absolutely dwarfs the 6.67% you typically see with a standard text post. This isn’t a small difference; it’s a game-changer, especially in a professional market like Germany, where 17.52 million users appreciate content that’s quick to digest on their phones.
Crafting a Compelling Narrative Arc
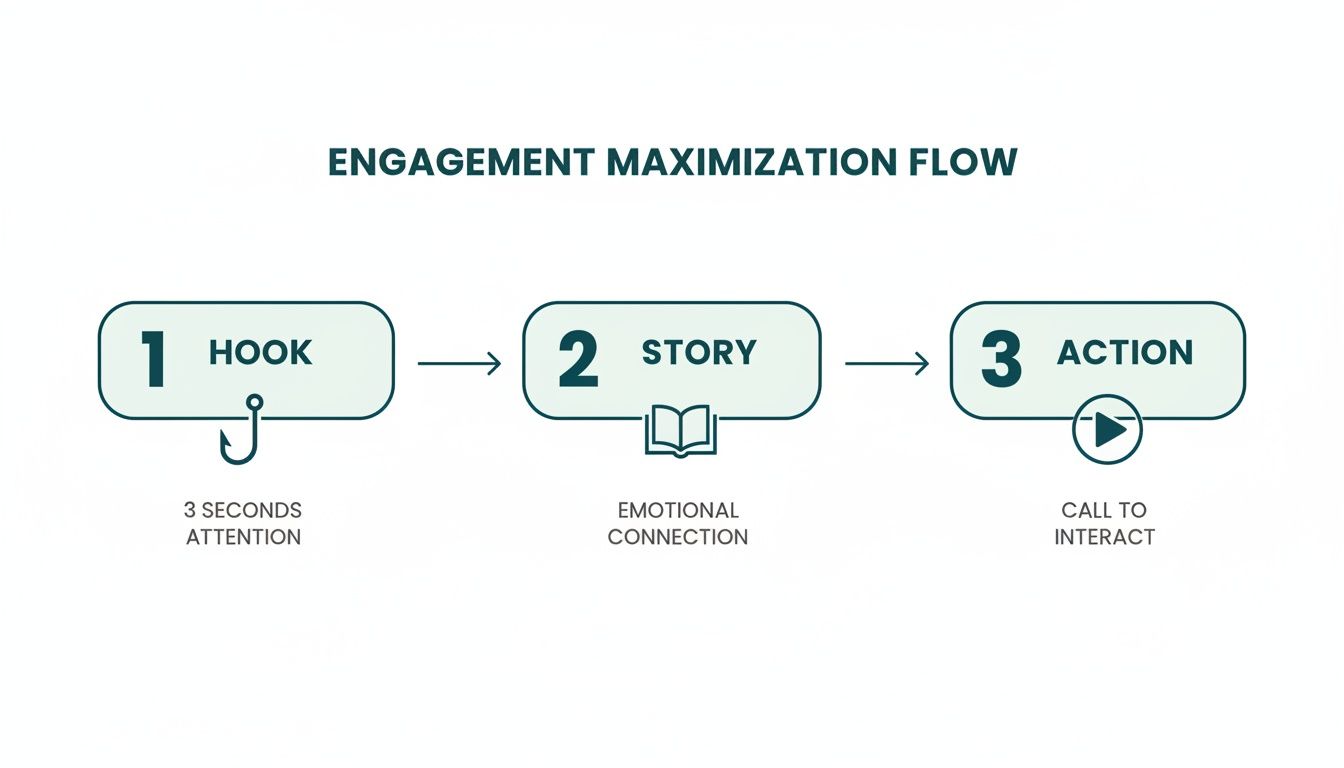
To build a carousel that truly performs, you have to think like a storyteller. Every great story has a beginning, a middle, and an end. Your carousel needs that same structure to keep your audience hooked from the first slide right through to the last.
Think of it like this:
- The Hook (First Slide): This is your make-or-break moment. Your opening slide has one job: to stop the scroll. Hit them with a provocative question, a surprising statistic, or a bold statement that piques their curiosity.
- The Build-Up (Middle Slides): These slides are where you deliver the goods. Break down your main topic into bite-sized, digestible points. Use clean visuals to showcase data or walk your audience through a clear, step-by-step process. Each slide should naturally flow into the next, building momentum as you go.
- The Payoff (Last Slide): Don’t just let your carousel fizzle out. Your final slide needs a clear purpose. End with a strong call-to-action (CTA) that tells your audience precisely what to do next. Ask a question to get comments flowing, point them to a link in the comments, or invite them to follow you for more.
High-Performing Carousel Ideas
The beauty of the carousel format is its flexibility. You can do so much with it. For anyone weighing up whether to use static slides or a video, this guide on Reel vs Carousel post formats is a great resource.
A great LinkedIn carousel doesn’t just present information; it takes the reader on a journey. The goal is to make each swipe feel like a rewarding discovery, keeping them engaged until the final call to action.
Here are a few proven ideas that work time and time again:
- Expert Tutorials: Break down a complex task into simple, easy-to-follow steps.
- Data Visualisations: Transform boring data into compelling charts and graphs that tell a story.
- Client Case Studies: Walk people through a success story—outline the problem, your solution, and the brilliant results.
- Insightful Listicles: Share your top tips, favourite tools, or go-to resources in a numbered list.
When you blend a strong story with genuinely valuable content, your carousels won’t just grab attention; they’ll start conversations. And to make sure your masterpiece gets seen, check out our guide on choosing the best hashtags for LinkedIn.
A Step-by-Step Guide to Creating and Uploading Carousels
Getting your LinkedIn carousel from an idea to a live post is a straightforward process once you have a solid workflow. This guide will walk you through the practical steps, from setting up your design file to hitting that post button, so you can share your carousels confidently every single time.
First things first, you need to set up your document correctly in your design tool. Whether you’re a fan of Canva, a Figma power user, or even whipping something up in PowerPoint, the core concept is the same. I always recommend starting with a custom-sized design—1080x1080 pixels for a square format is the most dependable and visually effective choice. Treat each page as a separate slide, making sure each one has a single, clear point. This keeps your audience focused and gives them a reason to keep swiping.
Designing and Exporting Your Carousel
After you’ve put the finishing touches on your slides, the next make-or-break step is the export. To ensure everything looks crisp and professional—especially text, logos, and any vector graphics—you absolutely must export the entire thing as one high-quality PDF. This also keeps any hyperlinks you’ve included active.
- Canva: Head to “Share,” then click “Download.” For the file type, choose “PDF Print” to get the best resolution. Make sure “All pages” is selected so they all merge into a single document.
- Figma: Simply select all of your frames on the canvas, navigate to the “File” menu, and choose “Export frames to PDF.” Figma will handle the rest and compile them into one file for you.
- PowerPoint: Go to “File,” then choose either “Save As” or “Export.” Select PDF as the format and check that the quality is set to “Best for printing” to avoid any compression issues.
This workflow is all about building a narrative that keeps your reader engaged from start to finish.
As you can see, the key is to grab attention with a strong hook, deliver value with a compelling story, and then prompt your audience with a clear call to action.
Uploading to LinkedIn
Now that you have your polished PDF, getting it onto LinkedIn is the easy part. Just follow these simple steps to get your carousel in front of your network.
- Start a Post: From your LinkedIn homepage, click on the “Start a post” field at the top of your feed.
- Add a Document: A new window will pop up. Look for the document icon at the bottom and click “Add a document.”
- Choose Your File: Click the “Choose file” button and navigate to the PDF you just saved on your computer.
- Add a Title: You’ll be prompted to give your document a title. Make it descriptive and intriguing, as this appears right above the carousel in the feed.
- Write Your Post: This is where you add context. Write a caption that hooks the reader, explains what the carousel is about, and includes relevant hashtags. Don’t forget a call-to-action! For more on planning your content calendar, check out our guide on how to schedule posts on LinkedIn.
- Post: Happy with everything? Click the “Post” button and you’re live
Taking Your Carousels to the Next Level
Once you’ve got the hang of the basics, it’s time to explore some more advanced techniques that can make your LinkedIn carousels truly stand out. These are the strategies that separate the good from the great, focusing on creating a slick user experience, encouraging direct action, and making sure your content is accessible to everyone. The aim is to turn a simple document post into an interactive experience that hooks your audience from slide one.
A seriously effective method is to create a seamless, panoramic feel across your slides. Instead of treating each slide as a standalone image, think of your entire carousel as one continuous canvas. You can achieve this by using graphic elements, flowing lines, or background colours that stretch across the slide breaks. It’s a clever design trick that sparks curiosity and practically begs the user to swipe left to see what comes next.
Making Your Carousels Interactive
Beyond pure aesthetics, you can build real functionality into your carousels by embedding clickable hyperlinks directly into your PDF. Most design tools, like Canva or Figma, let you add links to text boxes or images before you export the final document.
This is a game-changer for driving traffic and generating leads. Imagine the possibilities:
- Directing readers to the full article on your blog for a deeper dive.
- Linking straight to a product or service page on your website.
- Guiding them to a sign-up form for your newsletter or a waiting list.
By embedding links, you reduce the friction it takes for an interested person to act. Your carousel instantly transforms from a piece of passive content into an active tool for your business.
Putting Accessibility at the Forefront
Creating brilliant content means making it inclusive. Accessibility isn’t just a box-ticking exercise; it should be baked into your design process from the very beginning. Getting this right ensures your message connects with the widest possible audience, including people with visual impairments.
Here are a few key things to keep in mind:
- High Contrast: Make sure your text and background colours have enough contrast to be easily legible. Don’t sacrifice readability for style.
- Clear Fonts: Stick to clean, simple fonts and use a font size that’s comfortable to read, especially on a mobile screen.
- Descriptive Post Copy: While LinkedIn doesn’t let you add alt text to individual slides within the PDF, your main post description fills that role. Use that space to clearly summarise what the carousel is about.
Common Problems and How to Fix Them
Even the most meticulously planned carousel can hit a snag. It happens. But don’t worry—most problems you’ll encounter with the LinkedIn carousel post format are easy to fix and usually trace back to your export settings or file specs. Here’s a quick troubleshooting guide for the most common issues.
One of the biggest frustrations is uploading your beautiful carousel only to find the text and images are blurry or pixelated. This is almost always a result of exporting a low-resolution file from your design tool. LinkedIn compresses documents during upload, so if you start with a low-quality file, the final result will look fuzzy and unprofessional.
Another common roadblock is a straight-up upload failure. This usually means your file is too big. While LinkedIn’s official limit is a generous 100 MB, smaller files tend to upload more reliably. Remember, packing lots of high-resolution images across many slides can quickly push you over that limit.
Solving Blurry Visuals
If your carousel looks fuzzy, the fix lies in your export settings. Ditch any “Save for Web” or low-quality options right away.
- Export as a High-Quality PDF: In tools like Canva or PowerPoint, you need to choose the highest quality PDF setting. This is often called “PDF Print” or “Best for printing”. This option renders your document at a high resolution (usually 300 DPI), giving LinkedIn a crisp, clean file to work with before it applies its own compression.
- Embrace Vector Graphics: Whenever you’re working with logos, icons, or simple illustrations, use SVG files or native vector shapes. Unlike pixel-based images (like JPEGs or PNGs), vectors are mathematically defined, meaning they can be scaled to any size without a single drop in quality.
Think of it this way: giving LinkedIn a low-resolution PDF is like giving a professional printer a blurry photo. The final product can only ever be as good as the source material you provide.
Fixing Upload and Display Errors
When your file refuses to upload or just doesn’t display correctly, the solution is typically quite simple.
- Check Your File Size: If your file is too large, you’ll need to compress it. You can use a free online tool or your software’s built-in features to shrink the PDF. Just be careful not to overdo it and compromise the visual quality you just worked to preserve.
- Always Do a Mobile Preview: This is a crucial final check. Before you post, send the final PDF to your own phone and open it. Text that looked perfectly fine on your big desktop monitor can become completely unreadable on a small screen. A quick mobile preview can save you from publishing a carousel that’s impossible for a huge chunk of your audience to engage with.
Once your carousel is live and performing well, you’ll want to understand why. For a deeper dive into what makes your content tick, check out our detailed guide to LinkedIn post analytics.
LinkedIn Carousel Post Format FAQ
When you start digging into the specifics of LinkedIn carousel posts, a few questions always seem to pop up. Let’s tackle some of the most common ones I hear, so you can get your process dialled in and focus on creating great content.
One of the big “gotchas” that trips people up is what happens after you publish. Unfortunately, once your carousel is live, the document itself is locked in.
Can I Edit a Carousel After I Post It?
The short answer is no. You can’t edit the individual slides of a carousel once it’s been published. LinkedIn treats your uploaded document (which is almost always a PDF) as a single, unchangeable file.
If you find a typo or need to change a piece of information, your only real move is to delete the entire post and upload a new, corrected version. This is why a final, thorough proofread is so critical before you even think about hitting that “Post” button. A good tip is to send the final PDF to a colleague for a second set of eyes, or even just open it on your phone for a fresh perspective. You’d be surprised what you catch.
What Is the Ideal Number of Slides for a Carousel?
Technically, LinkedIn lets you upload a document with up to 300 slides, but don’t do that. Seriously. The sweet spot for keeping your audience engaged is much, much smaller. Most of the data I’ve seen points to carousels with between five and ten slides getting the best results. That’s enough real estate to tell a compelling story without making your audience feel like they’re starting a marathon.
A carousel is a story, not a novel. Keeping it concise shows you respect your audience’s time and makes it more likely they’ll swipe all the way to your final call-to-action—which is where the magic happens.
Anything less than five slides can feel a bit thin, like the idea isn’t fully fleshed out. Go over ten, and you’ll likely see a big drop-off in people who make it to the end. It’s all about finding that balance between depth and brevity.
How Can I Add Clickable Links to My Carousel Slides?
This is a fantastic feature, and it’s one of the main reasons to use the document upload method for carousels. It’s also surprisingly straightforward. The key is to embed your hyperlinks directly into your source file before you export it as a PDF.
Here’s how it generally works in any design tool:
- Select Your Element: In your editor of choice (like Canva, Figma, or even PowerPoint), click on the text box, image, or shape you want to make clickable.
- Add the Hyperlink: Find the linking option in the tool’s menu and paste in the full URL.
- Export as PDF: When you save your work, make sure you export it as a PDF. Choosing a high-quality preset like “PDF Print” is usually the best way to ensure your links stay active.
Once you upload that PDF to LinkedIn, your links will work perfectly, letting you send traffic directly from your carousel to a blog post, a landing page, or anywhere else you want your audience to go.
Ready to create stunning LinkedIn content without the hassle? Postline.ai combines powerful AI writing with your unique voice to generate and schedule standout posts in minutes. https://postline.ai

Run every client pipeline in one place
Give each LinkedIn profile its own voice, calendar, approval flow, and analytics. Start in minutes.
Start free trial