Your Complete Guide to LinkedIn Picture Post Size
Master the perfect LinkedIn picture post size for every format. Get the latest dimensions, aspect ratios, and specs to make your content stand out.
Nailing the right LinkedIn picture post size is the first step to making your content look sharp and professional. For a standard single-image post, stick to 1200 x 627 pixels for a landscape orientation or 1080 x 1080 pixels for a square. This ensures your visuals look crisp and avoid any awkward, automatic cropping.
Your Quick Reference Guide for All LinkedIn Image Sizes
Figuring out LinkedIn’s various image requirements can feel like a moving target. But if you get the dimensions wrong, you risk your images looking pixelated, having important details cut off, or just appearing distorted—all of which can seriously undermine your message.
This guide is designed to be your go-to cheat sheet. It cuts out the guesswork and helps you optimise every visual you share, from your personal profile to your company page updates.
LinkedIn Image Size Cheat Sheet
Here’s a quick lookup table with the essentials for the most common LinkedIn image types, including their recommended dimensions, aspect ratios, and file size limits. Keep this handy!
| Image Type | Recommended Dimensions (Pixels) | Aspect Ratio | Max File Size |
|---|---|---|---|
| Profile Picture | 400 x 400 | 1:1 | 8 MB |
| Personal Banner | 1584 x 396 | 4:1 | 8 MB |
| Company Logo | 400 x 400 | 1:1 | 4 MB |
| Company Cover | 1128 x 191 | 5.9:1 | 4 MB |
| Single Image Post | 1200 x 627 (Landscape) or 1080 x 1080 (Square) | 1.91:1 or 1:1 | 5 MB |
| Link Preview Image | 1200 x 627 | 1.91:1 | 5 MB |
Getting your link previews just right involves a bit more than just the image size. For a deeper dive, check out our guide on how to perfect the LinkedIn link preview card.
Fine-Tuning Your Professional Identity and Brand Pages
Think of your LinkedIn presence as your digital storefront. Before anyone reads your experience or skills, they see two things: your profile picture and your background banner. These visuals are your first handshake, instantly shaping how potential connections, recruiters, and clients see you. Getting the dimensions spot-on isn’t just about looking good; it’s a sign of professionalism and attention to detail.

For your personal profile picture, the magic number is 400 x 400 pixels. This ensures your headshot is crisp and fits perfectly inside that circular frame, whether viewed on a desktop or a mobile. A blurry, pixelated, or oddly cropped photo can immediately suggest a lack of care, and in the professional world, that small detail can make a big difference.
This is especially true in meticulous, detail-focused markets. Take Germany, for instance, which boasts over 20 million active LinkedIn users. Here, getting your profile picture right can dramatically increase your credibility. In fact, German users tend to judge profiles as 87% more trustworthy when the photo loads sharply without any distortion—a direct result of using the correct 400 x 400 pixel dimensions.
Key Dimensions for Personal and Company Pages
Your profile picture is just the start. Several other visual elements work together to build your presence. Sticking to the official specifications helps you avoid weird stretching or cropping, ensuring your brand looks consistently professional across the board.
Here are the key specs to keep in mind:
- Personal Background Photo: Aim for 1584 x 396 pixels. This wide, panoramic banner is your digital billboard. It’s the perfect space to showcase your personal brand, highlight your industry, or even display professional achievements.
- Company Page Logo: Just like a personal profile, your company logo should be 400 x 400 pixels. This guarantees it stays sharp and recognisable everywhere on the platform.
- Company Page Cover Image: The ideal size here is 1128 x 191 pixels. This is prime real estate for communicating your company’s mission, a new marketing campaign, or your brand’s core values.
A strong visual identity goes beyond simple aesthetics; it’s a powerful tool for building trust and becoming memorable. When your images are sized correctly and used consistently across your personal and company pages, you reinforce your brand message every time someone visits.
If you’re looking for some creative spark, check out our guide on the 10 best LinkedIn banner ideas to really make your profile pop. You can even take it a step further by adding interactive elements. For example, using a tool like a QR Code Generator lets you create a code that links directly to your portfolio, which you can then embed right into your banner image.
Getting Your Single Image Posts Right
A single, well-chosen image can make someone stop scrolling. It’s often more powerful than a block of text, but only if it looks right. If you get the dimensions wrong for your standalone image post on LinkedIn, you risk awkward cropping that can seriously damage your professional look and weaken your message.
LinkedIn actually gives you a few options here, supporting three main aspect ratios for single image posts. Each one has its place, and knowing which to use for what kind of content can make a real difference to how people engage with your post.
The Main Aspect Ratios and When to Use Them
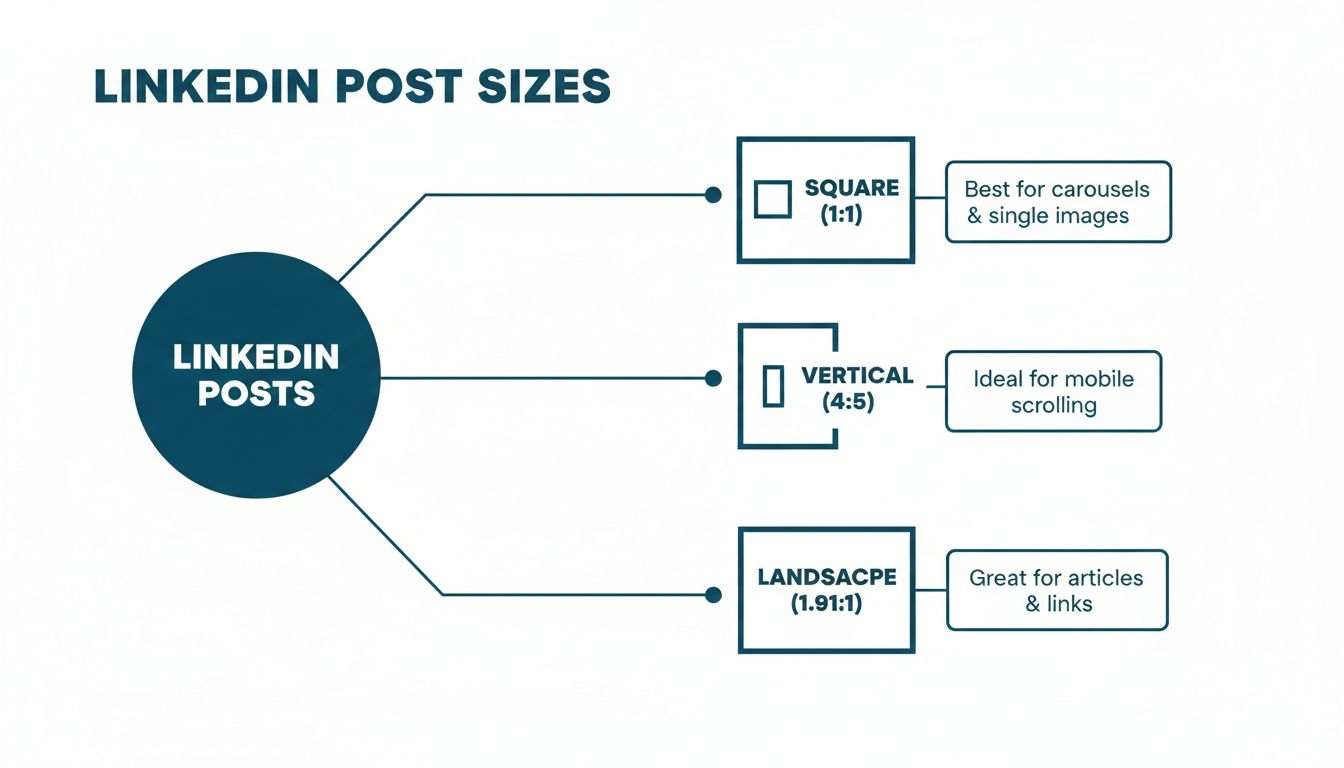
Let’s break down the three formats you can work with. Think about your visual and what you want it to achieve.
- Square (1:1): The go-to dimension here is 1080 x 1080 pixels. This is a solid, reliable choice. It looks great on both desktop and mobile feeds, giving you a balanced canvas for everything from professional headshots to quick announcements.
- Vertical (4:5): This one is a bit of an inside secret, as it’s not officially in LinkedIn’s documentation, but it works brilliantly. Aim for 1080 x 1350 pixels. On mobile, this format is a powerhouse. It fills more of the screen, pushing other posts out of the way and keeping eyes on your content for longer.
- Landscape (1.91:1): The classic horizontal format. The recommended size is 1200 x 627 pixels. This is best for wide shots like event photos, group pictures, or any graphic that’s naturally designed to be wider than it is tall. Just be aware that it takes up the least amount of space on a mobile feed.
Here’s a quick look at how you can add media to your posts using a tool like Postline.ai.
Using a scheduler simplifies the whole process, letting you concentrate on crafting the perfect image rather than getting bogged down in the technical details of posting.
To help you decide which format is best for your next post, here’s a quick comparison.
Single Image Post Format Comparison
| Aspect Ratio | Recommended Dimensions | Best Use Case | Key Consideration |
|---|---|---|---|
| Square (1:1) | 1080 x 1080 px | Versatile content like quotes, headshots, or product shots. | Safe, consistent look across all devices (desktop and mobile). |
| Vertical (4:5) | 1080 x 1350 px | Infographics, detailed visuals, and anything meant to grab attention on mobile. | Maximises screen space on mobile, but can feel tall on desktop. |
| Landscape (1.91:1) | 1200 x 627 px | Wide-angle photos, event banners, or group pictures. | Most effective on desktop; occupies the least vertical space on mobile feeds. |
As you can see, the best choice really comes down to where you expect your audience to see your content and what kind of visual you’re sharing. For maximum mobile impact, the 4:5 vertical format is hard to beat, while the 1:1 square is a dependable all-rounder.
Pro Tip: No matter which dimensions you choose, always keep your most important elements—like text, your logo, or the main subject—close to the centre. Think of this as your “safe zone.” It’s the best way to make sure that even if LinkedIn crops your image unexpectedly on different devices, the core of your message won’t get cut off.
Crafting Compelling Multi-Image and Carousel Posts
Moving beyond a single picture, you can use multi-image and carousel posts to tell a richer story, unpack complex ideas, or feature a range of products. It’s a fantastic way to boost engagement. But it’s not as simple as just uploading a handful of photos; LinkedIn has its own rules for how it arranges them in the feed.
The key thing to remember is that the first image you upload dictates the entire layout. If you start with a landscape (horizontal) image, LinkedIn will treat the whole set as a horizontal post. If you kick things off with a portrait (vertical) image, every other picture will be forced into a vertical layout. This can lead to some pretty aggressive and unexpected cropping, especially for any landscape photos you’ve mixed in.
To get a better feel for this, take a look at the core post sizes you’ll be working with.
As you can see, each aspect ratio has its place. Understanding this is absolutely crucial when you’re planning a multi-image post where a consistent look is everything.
How LinkedIn Arranges Multi-Image Posts
LinkedIn’s grid system adapts based on the number of images you upload. If you plan your visuals with these automatic layouts in mind, you can make sure your post looks professional and that nothing important gets cut off.
Here’s a quick rundown of the most common setups:
- Two Images: LinkedIn places them side-by-side. If you’ve used two vertical images, you’ll get two vertical rectangles. Two landscape images will appear as two horizontal rectangles. Simple.
- Three Images: This one’s a bit different. You’ll get one main image on one side, with two smaller, stacked images on the other. The orientation of that first image determines which side gets the bigger spot.
- Four Images: This creates a clean and predictable 2x2 grid. It’s a really balanced layout and a safe bet if you’re showing off four related items or concepts.
- Five or More Images: LinkedIn displays the first four pictures in that same 2x2 grid, but the fourth image gets an overlay showing how many more are hidden (e.g., +1, +2). Viewers have to click to see the rest.
A thoughtfully designed multi-image post guides your audience through a visual journey. When you know how LinkedIn is going to crop and arrange your pictures, you can create a seamless flow that tells a complete story without any awkward cuts.
If you’re really serious about sequential storytelling, you might want to look into creating a dedicated LinkedIn carousel post. These use a document (PDF) format, giving you much more control over the slide-by-slide experience.
Understanding Technical Specs and File Formats
Getting the right dimensions for your LinkedIn post is half the battle, but the technical details are what truly make or break the final look. If you ignore these specs, you risk running into blurry images, weird compression artefacts, or frustrating upload errors. It’s a small detail that makes a big difference.
Beyond just the size, LinkedIn has its own set of rules for the types of files you can upload and how big they can be. Nail these, and you’ll ensure your visuals always look sharp and professional, preserving all the hard work you put into creating them.
Supported File Formats and Size Limits
LinkedIn is pretty flexible with image files, but it definitely has its favourites. Sticking to the recommended formats is the easiest way to sidestep any compatibility problems and make sure your content shows up properly for your entire audience.
- File Formats: You can’t go wrong with JPG, PNG, or GIF. These are the standard formats that give you a great balance between image quality and file size.
- File Size Limits: For a typical image post, keep your file under 5 MB. Company logos have a slightly stricter limit at 4 MB, whereas your personal profile picture gets a bit more breathing room at 8 MB.
If you find your image is too big, don’t just shrink it and hope for the best. Use a good image compression tool to bring the file size down without sacrificing too much quality. This also helps your posts load faster, which is a big plus for anyone on a slower internet connection.
Here’s a pro tip: LinkedIn is going to compress whatever you upload, no matter what. By starting with a high-quality, well-optimised image, you’re giving its compression algorithm a much better file to work with. The result is a crisper, cleaner image on the other side.
Image Quality and Export Settings
The way you save your image is just as crucial as how you designed it. The right export settings are key to maintaining vibrant colours and sharp details, helping you avoid that washed-out or pixelated appearance that can instantly cheapen your professional brand.
For a deeper dive into making sure your images stay high-quality and dodge common compression problems across different platforms, guides on topics like Lightroom export settings for Instagram can offer some really useful, transferable knowledge about technical specs and file handling.
How to Avoid Common LinkedIn Image Cropping Issues
There’s nothing more frustrating than crafting the perfect image for a post, only to see LinkedIn awkwardly chop off your headline or logo. It instantly undermines the professional look you were going for. This usually happens when an image that looks perfectly fine on a desktop feed gets automatically reframed for the vertical scroll on mobile.
The secret to dodging this bullet is to design with a “safe zone” in mind. Think of it as an invisible frame within your image where all your critical elements—text, key parts of a photo, and logos—need to live. By keeping the important stuff huddled towards the centre, you can be confident it will stay in view, no matter how LinkedIn decides to display it.
This simple, proactive step ensures your visual message lands exactly as intended, whether someone sees it on their laptop or their phone. The goal is to create one universally solid image, regardless of the final linkedin picture post size or how it’s presented.
Proactive Design Strategies for Cropping
To consistently beat the cropping algorithm, it pays to build a few smart habits into your design process. It’s all about anticipating the platform’s behaviour before you hit “post.”
- Centre Your Core Message: Make it a rule to always place your main subject, headline, or call-to-action right in the middle third of your image. This area is almost always safe from the cropping axe.
- Test on Mobile First: A huge chunk of LinkedIn’s audience is scrolling on their phones. Before you finalise anything, preview your image on a mobile device to see exactly how it looks in a vertical feed.
- Avoid Text Near Edges: Never, ever place crucial text or logos too close to the top, bottom, or side edges. Always leave a generous buffer around the entire design.
Building these habits will save you a world of headaches. For more tips on crafting content that performs well, have a look at our article on LinkedIn post best practices.
The Role of Aspect Ratios
Getting a handle on aspect ratios is the real key to solving cropping problems for good. When you’re posting a single image, a square 1:1 ratio (we recommend 1080 x 1080 pixels) is your safest bet. It just works, displaying consistently and reliably across both desktop and mobile.
While a taller, vertical 4:5 image can look great by taking up more screen real estate on mobile, it’s also the most likely to get cropped weirdly in the desktop feed. The 1:1 square is a fantastic compromise that keeps your composition predictable everywhere.
By choosing your aspect ratio with intent and designing within that central safe zone, you regain control over how people see your content. This ensures every post looks polished, professional, and exactly how you planned.
Common Questions About LinkedIn Image Sizes
Even after you’ve got all the specs down, a few tricky questions can still pop up. Let’s clear up some of the most common ones we hear, so you can handle those specific situations and get your visuals posted without a second thought.
Does LinkedIn Compress My Images?
Yes, it absolutely does. LinkedIn compresses every image you upload, which is standard practice for social networks. They do this to make sure pages load quickly for everyone, especially people browsing on their phones.
The best way to deal with this is to give their system a high-quality file to start with. Export your graphics as a PNG or JPG, making sure the resolution is high but the file size stays under the limit (like 5 MB for a standard post). When LinkedIn’s compression algorithm has a better-quality image to work with, the final result on your feed will look much crisper.
What’s the Best Format for Images with Text?
When your image has a lot of text on it—think infographics, event announcements, or quote graphics—PNG is almost always your best bet. PNG files do a fantastic job of keeping text sharp and lines clean, avoiding the blurry edges or “artefacts” that can sometimes show up when a JPG is compressed.
A high-quality JPG can do the job in a pinch, but a PNG will deliver that clean, professional look you want. This is especially important when the clarity of your text is critical to getting your message across.
Should I Go Back and Update Old Posts with New Image Sizes?
In short, no. It’s generally not worth your time to dig through old posts and update images to meet new guidelines. LinkedIn is built to handle older content, so your past posts should continue to display just fine.
Your energy is much better spent applying the latest specs to all your new content. The platform’s algorithm favours fresh posts, so creating perfectly optimised new material will give you a much better return than tinkering with your archives.
A Quick Tip: While you can leave old posts alone, it’s a great idea to review your main profile and company page visuals every six months or so. Your profile picture, banner, and logo are the face of your brand and should always look sharp and up-to-date.
Can I Just Use the Same Image on All My Social Media Accounts?
It’s tempting for the sake of efficiency, but we strongly advise against it. Every social platform has its own ideal image sizes and aspect ratios. An image that looks perfect as a LinkedIn landscape post (1200 x 627 pixels) will get awkwardly cropped or zoomed in on Instagram Stories, which needs a tall 1080 x 1920 pixel format.
Customising your images for each platform is a small step that makes a big difference. It shows you care about the details and ensures your content always looks its best, maximising its impact. Taking those few extra minutes to resize your visuals is always a worthwhile investment.
Ready to create perfectly sized, professional LinkedIn posts without the guesswork? Postline.ai combines powerful AI writing with easy media support, helping you schedule a full week of standout content in minutes. Stop worrying about dimensions and start growing your influence. Try Postline.ai today!

Run every client pipeline in one place
Give each LinkedIn profile its own voice, calendar, approval flow, and analytics. Start in minutes.
Start free trial